
How to use Form Component Control to Edit Related Entity Information in Dynamics 365 CRM

In the recent release of the Dynamics 365 CRM, new features have been added. One of the most important and useful features among these is the feature to see and edit data of the related entity on the main form using the “Form Component Control”.

A feature like this is useful in many ways, for example, if a salesperson is working on the Opportunity record and they want to change some related information of a customer then they can do it on the same form itself. Previously, if the same salesperson wanted to edit the information of the customer, they needed to open records of the customer and then change the information. This was not efficient, previously with the help of Quick View Form we could see the data of related records but now using Form Component Control they can edit information of related entity records.

We can edit the related record information within the same form, by following the below steps:

Go to Customizations  -> Customize the System -> go to Opportunity entity -> open Opportunity form and select account lookup field -> click on change properties. Once we click on change properties, it will open the following window


Go to the Controls tab and select the Form Component Control as shown below.


Once we select Form Component Control, it will look like the screenshot shown below.


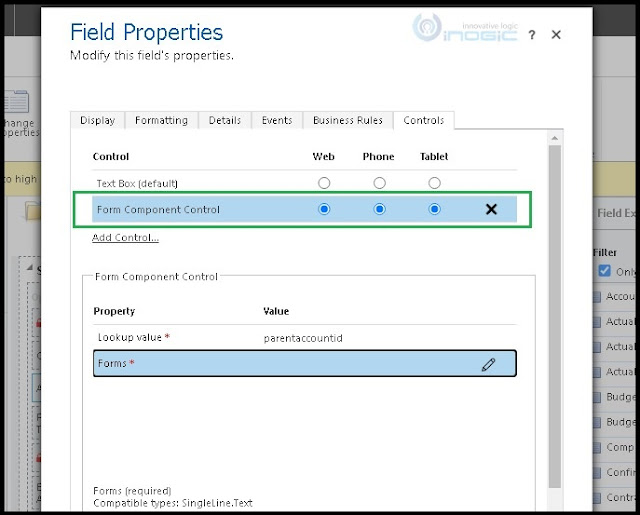
To set properties click on the edit icon as shown in the above screenshot.

Once we click on the edit icon, it will open a window, select “Bind to a static value” option andthen enter value inthe text box in the below format.

<QuickForms><QuickFormIds><QuickFormId entityname={Entity logicalname}>{FormId}</QuickFormId></QuickFormIds></QuickForms>

As we want to edit customer (account) information on opportunity, we have to select entity name as account and account entity form ID,you can select any entity form ID.

<QuickForms><QuickFormIds><QuickFormId entityname=“account”>C9E7EC2D-EFCA-4E4C-B3E3-F63C4BBA5E4B</QuickFormId></QuickFormIds></QuickForms>


Once we set the properties value and click on Ok, save and publish the form. Once we publish, we are ready to see and edit customer (account) information on the opportunity form as shown below. We can see the first tab of the account form, all scripts added on account form and business rule are executed.


Conclusion

With the help of Form Component Control we can easily edit related information on the main form.

Comments

Popular posts from this blog

Microsoft Dynamics 365 CRM Troubleshooting Solution Import Errors

Remember when CRM life was so much simpler that solutions did not yet exist? If you had separate development and production environments and you wanted to move your customizations, you simply clicked  Export Customizations  and voila! It was done. Those were the days. Nostalgia Warning – in case you’ve forgotten, here’s a screenshot to jog your memory: With CRM 2011, the concept of solutions was introduced, giving us a new set of powers – by picking individual entities, workflows, etc., we now had the ability to group together and move only those customizations we wanted to include in our solution. The next great solutions advancement came with CRM 2016: we can now select specific components within each individual entity – so instead of moving the entire contact entity, for example, we have the option of moving only a certain view or field within the entity. And we can do this without having to hack the xml in the zip file. (By the way, if you want to learn more abou...

How to Filter SubGrid Lookup view in Dynamics 365 CRM

How to Filter SubGrid Lookup view in Dynamics 365 CRM.  Please check the comments in the below code and do follow the steps accordingly and call the  filterSubGrid() funtion on onload. var LastQuery = ""; function filterSubGrid() { debugger; setSubgridLookupFiltering(); } function AddLookupFilter(entity_type, customFilter) { var subgridLookup = Xrm.Page.getControl("lookup_Contacts_Participants"); subgridLookup.addCustomFilter(customFilter, entity_type); } function setSubgridLookupFiltering() { var subgridAddButtonId = "Contacts_Participants_addImageButton"; //Try to get the element from both the current and the parent document. var subgridAddButton = document.getElementById(subgridAddButtonId) || window.parent.document.getElementById(subgridAddButtonId); //This script may run before the subgrid has been fully loaded on the form. If this is the case, //delay and retry until the subgrid has been loaded. if (subg...

How to prevent record from saving in Dynamics CRM using Javascript

  From time to time you might need to add some validation to the save event of an entity, this actually used to be an approach I would use on a regular basis but since the introduction of business rules have found myself doing this less and less. But still, knowing the ability is available is handy. When you define the onsave event function, you must tick the “Pass execution contact as first parameter” option. (See below) Having done that you can create an onSave function with code similar to the example I have shown below. Note forgetting the “(context)”, which will take the context parameter allowing you to prevent the save when needed. function onSave(context) { var saveEvent = context.getEventArgs(); if (Xrm.Page.getAttribute("telephone1").getValue() == null) { // *** Note: I am using an alert for testing a notification maybe better! alert("Put in a phone number!"); saveEvent.preventDefault(); } } Note: This simple example might be better achi...